Solar Panel Mounting Options: Choosing the Right System
Understanding Solar Panel Mounting Systems Key Considerations
So, you're going solar! Awesome! But before those shiny panels start soaking up the sun and saving you money, you gotta figure out how to actually *attach* them to your roof (or ground, or wherever you're planning to put them). This is where solar panel mounting systems come in. They're not all created equal, and choosing the right one is crucial for performance, longevity, and frankly, your peace of mind.
Think of mounting systems as the unsung heroes of your solar setup. They're responsible for:
* Securing the panels: Obviously, you don't want your investment flying off in the first strong gust of wind. * Maintaining panel angle: Optimizing the angle of your panels to the sun can significantly boost energy production. * Providing proper ventilation: Overheating can reduce panel efficiency and lifespan. * Protecting your roof: A good mounting system will minimize the risk of leaks and other damage.Before diving into specific types, let's cover some key considerations:
* Roof type: Asphalt shingles? Tile? Metal? Each requires a different approach. * Roof pitch: The angle of your roof affects the type of mounting hardware you'll need. * Local climate: High winds? Heavy snow? Your mounting system needs to withstand the elements. * Panel size and weight: Larger, heavier panels require sturdier mounting solutions. * Budget: Mounting systems vary in price, so it's important to find one that fits your budget without sacrificing quality. * Local regulations and permits: Check with your local authorities to ensure your installation meets all requirements. This is REALLY important. Don't skip this step!Roof Mounting Options Pitched Roof Solar Panel Mounting Solutions
For most homeowners, roof mounting is the most common and practical option. Let's break down the types for pitched roofs (the ones that aren't flat):
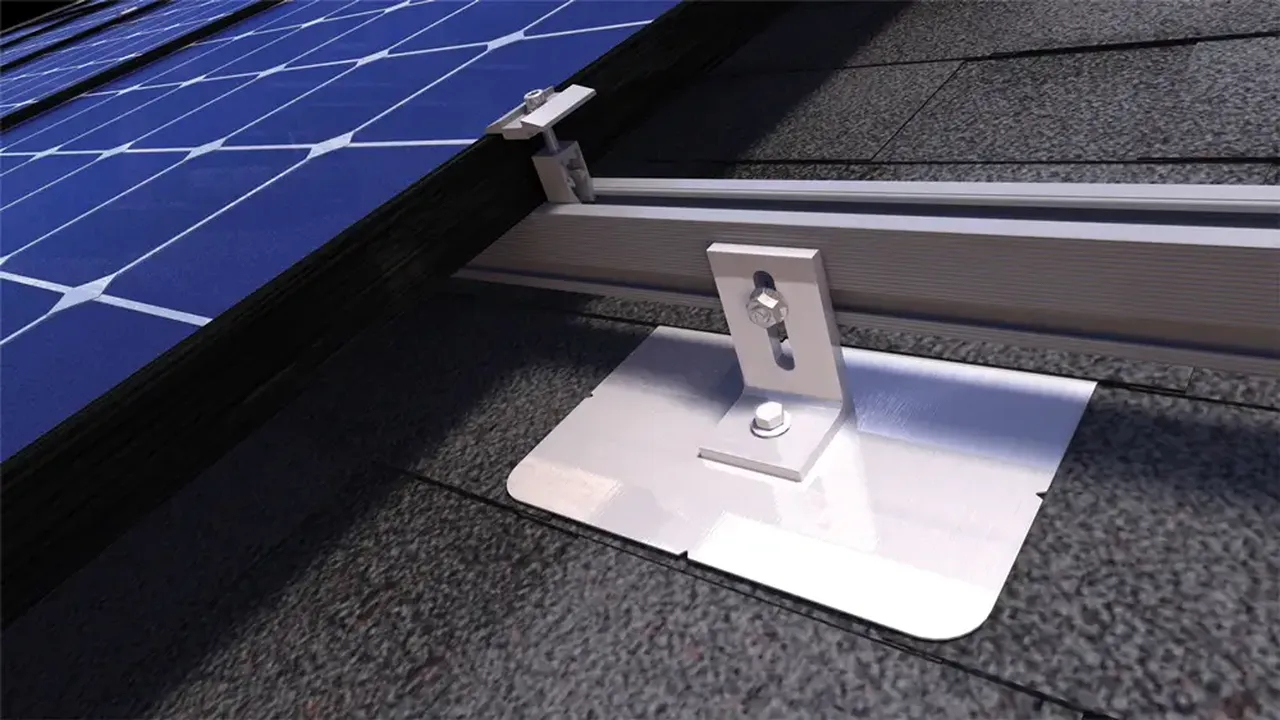
* Railed Systems: This is the most popular type. Rails are attached to the roof using mounting brackets (also called "feet"), and the panels are then clamped to the rails. * Pros: Versatile, relatively easy to install, widely available, adjustable for optimal panel angle. * Cons: Can be more expensive than other options, requires penetrating the roof (which can increase the risk of leaks if not done properly). * Example Product: SnapNrack Series 100. This is a well-regarded, robust system with good adjustability. It costs around $25-$40 per panel, excluding labor. * Example Product: IronRidge XR1000. Another popular choice, known for its strength and durability. Expect to pay in the same price range as SnapNrack. * Rail-less Systems: These systems attach the panels directly to the roof using specialized mounting hardware, eliminating the need for rails. * Pros: Sleeker appearance, potentially faster installation, can be less expensive than railed systems. * Cons: Less adjustable, may not be suitable for all roof types or panel sizes, requires very precise installation. * Example Product: Quick Mount PV QuickHook. This system uses a flashing that integrates directly with the roof shingles for a watertight seal. Cost is typically $30-$50 per panel. * Example Product: Ecolibrium EcoFoot2+. A rail-less system that minimizes roof penetrations. Expect similar pricing to Quick Mount PV. * Shared Rail Systems: This is a variation of the railed system where a single rail supports two rows of panels, reducing the amount of hardware needed. * Pros: Cost-effective, reduces material usage. * Cons: Less flexible than standard railed systems, may not be suitable for all roof layouts.Flat Roof Solar Panel Mounting Options Ballasted and Attached Systems
Flat roofs present a different set of challenges. Since there's no natural pitch, you need a system that can provide the necessary angle for optimal sun exposure.
* Ballasted Systems: These systems use weights (usually concrete blocks) to hold the panels in place, eliminating the need for roof penetrations. * Pros: No roof penetrations, relatively easy to install, can be repositioned if needed. * Cons: Requires a strong roof to support the weight, may not be suitable for high-wind areas, can be visually unappealing. * Example Product: IronRidge FlashLoc Base with ballast blocks. This system is designed for low-slope roofs and uses a combination of flashing and ballast to secure the panels. The FlashLoc Base itself costs around $20-$30 per panel, but you'll also need to factor in the cost of the ballast blocks (usually purchased separately). * Example Product: SunLink Flat Roof System. A modular system that allows for easy adjustments and expansion. Pricing is comparable to IronRidge. * Attached Systems: These systems are bolted directly to the roof, providing a more secure attachment. * Pros: More secure than ballasted systems, suitable for high-wind areas. * Cons: Requires roof penetrations, can be more difficult to install.Ground Mount Solar Panel Systems Space and Angle Considerations
If roof mounting isn't an option, or if you want to maximize energy production by optimizing the panel angle, a ground-mounted system might be the way to go.
* Standard Ground Mounts: These are typically constructed from galvanized steel or aluminum and are anchored to the ground using concrete footings or driven posts. * Pros: Allows for optimal panel angle, easy access for maintenance, doesn't require roof penetrations. * Cons: Requires more space, can be more expensive than roof mounting, may require permits. * Example Product: DPW Solar Power Rail Ground Mount System. This is a robust and adjustable system that can accommodate a variety of panel sizes and configurations. Expect to pay $50-$80 per panel, plus the cost of concrete and installation. * Example Product: RBI Solar Ground Mount. A customizable system that can be adapted to different site conditions. Pricing is similar to DPW Solar. * Pole Mounts: These systems mount the panels on a single pole, allowing them to be rotated to track the sun throughout the day. * Pros: Maximizes energy production, requires less space than standard ground mounts. * Cons: More expensive than standard ground mounts, requires a strong foundation, may require specialized installation.Material Matters Solar Panel Mounting Material Options and Comparison
The materials used in your mounting system will affect its durability, longevity, and cost. Here's a quick rundown:
* Aluminum: Lightweight, corrosion-resistant, and relatively inexpensive. The most common material for solar panel mounting systems. * Galvanized Steel: Strong and durable, but more susceptible to corrosion than aluminum. Often used for ground-mounted systems. * Stainless Steel: Highly corrosion-resistant, but more expensive than aluminum or galvanized steel. Used in harsh environments (e.g., coastal areas).Comparison Table:
| Material | Pros | Cons | Typical Applications | Price (Relative) |
|---|---|---|---|---|
| Aluminum | Lightweight, corrosion-resistant, inexpensive | Lower strength than steel | Roof mounts, some ground mounts | Medium |
| Galvanized Steel | Strong, durable | Susceptible to corrosion | Ground mounts, some roof mounts | Low |
| Stainless Steel | Highly corrosion-resistant | Expensive | Coastal areas, harsh environments | High |
Installation DIY vs Professional Solar Panel Mounting Installation
You *can* install a solar panel mounting system yourself, but it's not a task to be taken lightly. It requires a good understanding of roofing techniques, electrical wiring, and safety procedures. Also, messing up can void your warranty, damage your roof, or, worst case, injure yourself.
DIY Pros: Save money on labor costs.
DIY Cons: Requires specialized knowledge and tools, can be time-consuming, potential safety risks, may void warranties.
Professional Installation Pros: Ensures proper installation, reduces risk of damage, often includes a warranty on the installation work.
Professional Installation Cons: More expensive than DIY.
Recommendation: Unless you're a very experienced DIYer with a solid understanding of roofing and electrical work, it's generally best to hire a qualified solar installer. They'll have the expertise and equipment to get the job done safely and efficiently.
Cost Considerations Solar Panel Mounting Price Breakdown
The cost of a solar panel mounting system can vary depending on several factors, including:
* Type of system: Railed systems tend to be more expensive than rail-less systems. * Material: Stainless steel is more expensive than aluminum or galvanized steel. * Complexity of the installation: A complex roof layout or difficult site conditions can increase the cost. * Labor costs: Professional installation will add to the overall cost.Typical Price Ranges (per panel):
* Railed Systems: $25 - $50 * Rail-less Systems: $30 - $60 * Flat Roof Systems: $35 - $70 * Ground Mount Systems: $50 - $100+These are just estimates. Get quotes from multiple suppliers and installers to get a better idea of the actual cost for your specific project.
Maintaining Your System Ongoing Maintenance Tips for Solar Panel Mounts
Once your solar panel mounting system is installed, it's important to perform regular maintenance to ensure its longevity and performance. Here are a few tips:
* Inspect the system regularly: Check for loose bolts, corrosion, and any signs of damage. * Clean the panels: Dust, dirt, and debris can reduce panel efficiency. * Trim any vegetation: Overhanging trees or shrubs can shade the panels and reduce energy production. * Check for leaks: If you have a roof-mounted system, inspect the roof around the mounting points for any signs of leaks. * Consult a professional: If you notice any significant problems, contact a qualified solar installer for assistance.By choosing the right solar panel mounting system and performing regular maintenance, you can ensure that your solar investment provides years of reliable energy production.
:max_bytes(150000):strip_icc()/277019-baked-pork-chops-with-cream-of-mushroom-soup-DDMFS-beauty-4x3-BG-7505-5762b731cf30447d9cbbbbbf387beafa.jpg)