Solar Panel Installation: A Step-by-Step Overview

Understanding Solar Panels and Installation Basics Solar Panel Installation Guide
So, you're thinking about going solar? Awesome! It's a fantastic way to save money, reduce your carbon footprint, and even increase your home's value. But where do you even begin? Installing solar panels might seem daunting, but this step-by-step overview will break it down for you. We'll cover everything from assessing your needs to flipping the switch and enjoying the sun's free energy.
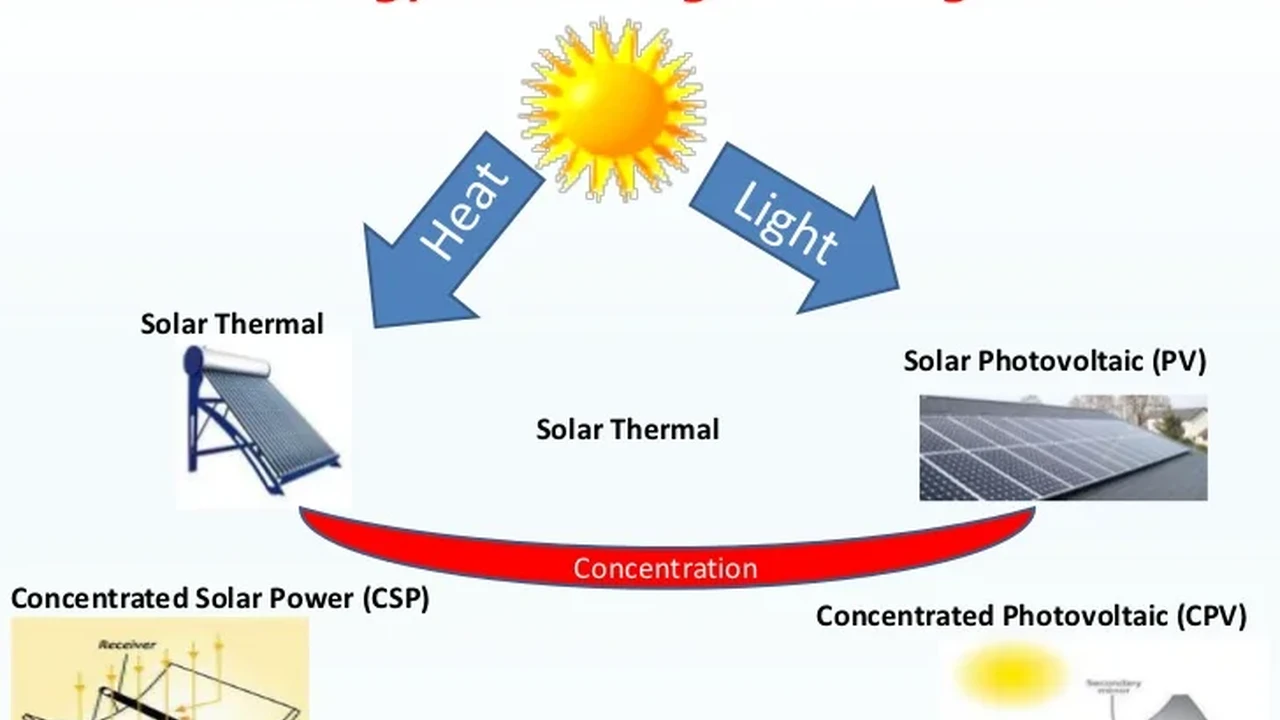
First things first: let's get a grip on what solar panels actually are and why installation is so crucial. Solar panels, also known as photovoltaic (PV) panels, convert sunlight directly into electricity. When installed correctly, they can power your entire home or business, significantly cutting down your electricity bills. A poorly installed system, however, can be inefficient, dangerous, and even void your warranty. That's why doing it right is key!
Step 1: Assess Your Solar Needs and Energy Consumption Solar Panel Sizing and Energy Audit
Before you start drilling holes in your roof, you need to figure out how much solar power you actually need. This involves a bit of detective work on your energy consumption. Gather your electricity bills from the past year. Look for the kilowatt-hours (kWh) you've used each month. This will give you a good idea of your average daily and monthly energy consumption.
Once you have your energy consumption data, you can use a solar panel sizing calculator (many are available online) to estimate the number of solar panels you'll need. Factors like your roof's orientation (south-facing is best in the northern hemisphere), shading, and the efficiency of the solar panels will all play a role. Don't forget to account for future energy needs, like if you plan to buy an electric vehicle or add a swimming pool.
Step 2: Site Assessment and Roof Evaluation Solar Panel Roof Inspection and Suitability
Next up is assessing your roof. Is it in good condition? Will it need repairs or replacement soon? A new roof might be necessary before installing solar panels to avoid having to remove the panels later for roof work. Check for any signs of leaks, rot, or sagging. Also, consider the age of your roof. Most solar panels have a lifespan of 25-30 years, so you want a roof that can last just as long.
The angle and orientation of your roof are also important. South-facing roofs generally receive the most sunlight, but east or west-facing roofs can still be viable, especially with modern high-efficiency panels. Shadows are a major enemy of solar panel efficiency. Trees, chimneys, and other obstructions can significantly reduce the amount of sunlight reaching your panels. Trim back trees or consider alternative panel placement to minimize shading.
Step 3: Choosing Your Solar Panels and Inverter Solar Panel Types and Inverter Selection Guide
Now for the fun part: picking out your solar panels! There are three main types of solar panels: monocrystalline, polycrystalline, and thin-film. Monocrystalline panels are the most efficient and expensive, polycrystalline panels are a bit less efficient and more affordable, and thin-film panels are the least efficient but also the most flexible and lightweight.
Monocrystalline Panels: These panels are made from single silicon crystals and are known for their sleek, black appearance and high efficiency (around 17-22%). They perform well in low-light conditions and have a longer lifespan. A popular choice is the LG NeON 2 (now LG is no longer manufacturing solar panels, alternatives are available from other manufacturers), known for its high efficiency and durability. Expect to pay around $3-$4 per watt for monocrystalline panels.
Polycrystalline Panels: These panels are made from multiple silicon crystals and have a speckled, blue appearance. They are generally less expensive than monocrystalline panels but also slightly less efficient (around 15-17%). They are a good option for those on a tighter budget. A common polycrystalline panel is the Canadian Solar CS6K-280M, offering good value for the price. Expect to pay around $2.50-$3.50 per watt.
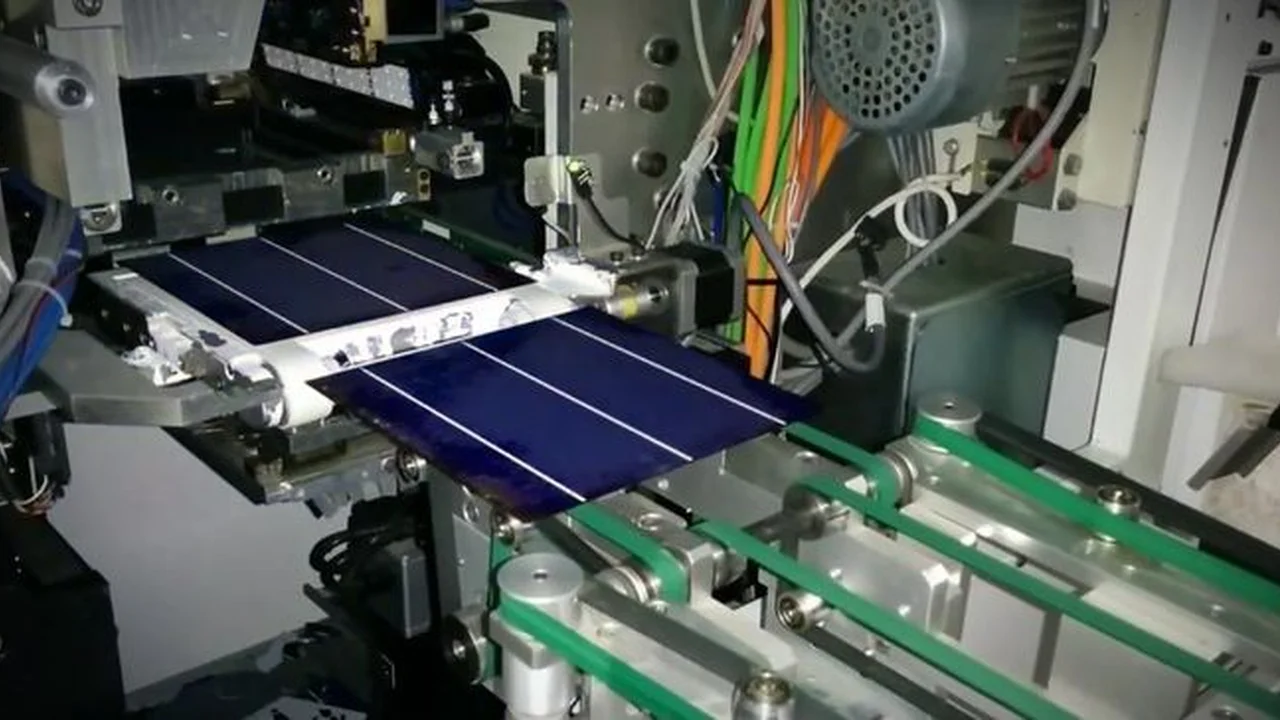
Thin-Film Panels: These panels are made by depositing a thin layer of photovoltaic material onto a substrate. They are flexible, lightweight, and can be manufactured in various shapes and sizes. However, they are the least efficient (around 10-13%) and require more space to generate the same amount of power. A well-known thin-film panel is the First Solar Series 6, often used in large-scale solar farms. Expect to pay around $2-$3 per watt.
The inverter is another crucial component of your solar system. It converts the direct current (DC) electricity generated by the solar panels into alternating current (AC) electricity that your home can use. There are two main types of inverters: string inverters and microinverters.
String Inverters: These inverters are connected to a "string" of solar panels. They are more affordable than microinverters but are less efficient if some panels are shaded. A popular string inverter is the SMA Sunny Boy, known for its reliability and efficiency. Expect to pay around $1,000-$2,000 for a string inverter.
Microinverters: These inverters are attached to each individual solar panel. They are more expensive than string inverters but are more efficient, especially in shaded conditions, as each panel operates independently. The most popular microinverter is the Enphase IQ7+, known for its ease of installation and monitoring capabilities. Expect to pay around $200-$300 per microinverter.
Product Comparison Table
| Panel Type | Example Product | Efficiency | Price per Watt (Approx.) | Best Use Case |
|---|---|---|---|---|
| Monocrystalline | LG NeON 2 (Note: Production Discontinued, find alternatives) | 17-22% | $3-$4 | Homes with limited roof space, high energy needs |
| Polycrystalline | Canadian Solar CS6K-280M | 15-17% | $2.50-$3.50 | Budget-conscious homeowners |
| Thin-Film | First Solar Series 6 | 10-13% | $2-$3 | Large-scale solar farms, flexible applications |
| Inverter Type | Example Product | Efficiency | Price (Approx.) | Best Use Case |
|---|---|---|---|---|
| String Inverter | SMA Sunny Boy | 96-98% | $1,000-$2,000 | Unshaded roofs, simpler installations |
| Microinverter | Enphase IQ7+ | 97-99% | $200-$300 (per panel) | Shaded roofs, complex installations, individual panel monitoring |
Step 4: Permitting and Paperwork Solar Panel Installation Permits and Regulations
Before you start any actual installation work, you'll need to obtain the necessary permits from your local government. The permitting process can vary depending on your location, so it's best to check with your city or county planning department. They will likely require detailed plans of your solar system, including the placement of the panels, the wiring diagram, and the specifications of the equipment.
In addition to permits, you may also need to notify your homeowner's association (HOA) if you have one. Some HOAs have restrictions on the appearance of solar panels, so it's important to get their approval before proceeding. Failing to obtain the necessary permits or HOA approval can result in fines or even the removal of your solar panels.
Step 5: Solar Panel Installation Mounting System and Wiring Connections
Now for the hands-on part! This is where you (or your professional installer) will actually mount the solar panels on your roof. The mounting system is crucial for securely attaching the panels to your roof and ensuring they can withstand wind, rain, and snow. There are various types of mounting systems available, depending on your roof type and the size of your solar panels.
Once the mounting system is in place, you can start attaching the solar panels. Make sure to follow the manufacturer's instructions carefully and use the proper tools. The panels are typically connected in series (to increase voltage) and then in parallel (to increase current). The wiring connections must be secure and weatherproof to prevent shorts or other electrical problems.
Step 6: Connecting to the Grid and System Activation Solar Panel Grid Connection and Testing
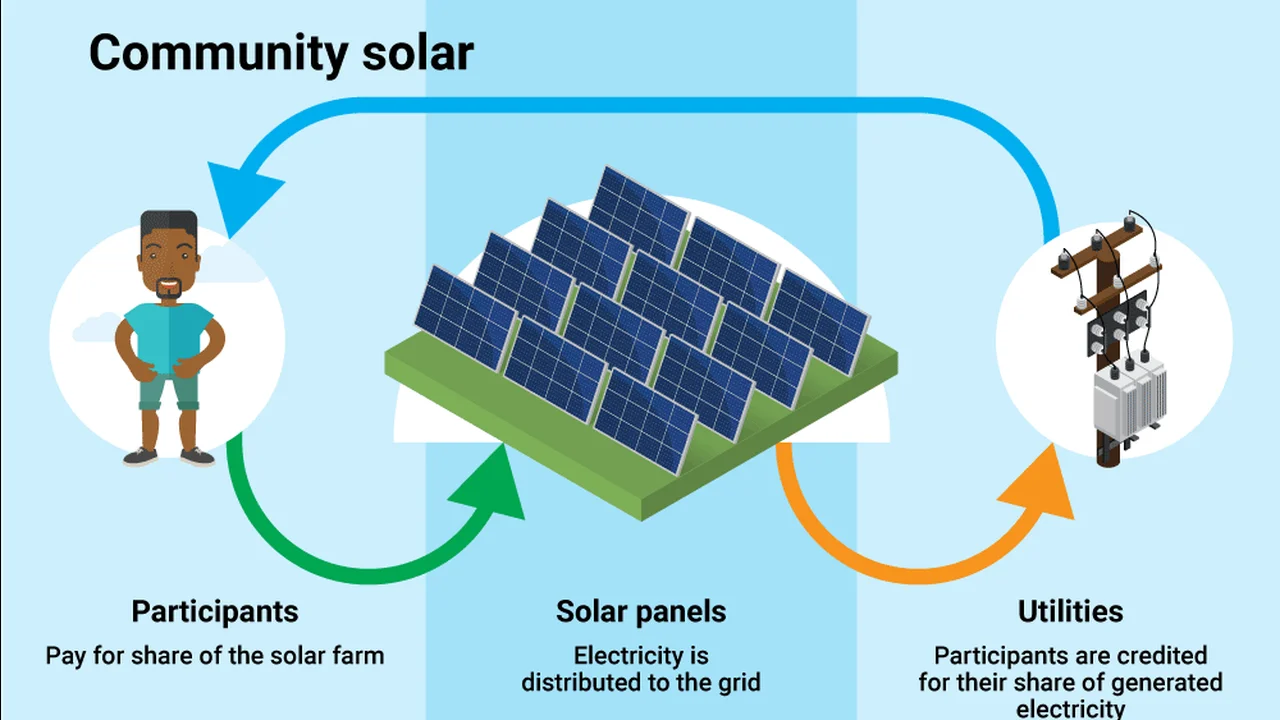
After the solar panels are installed and wired, you'll need to connect your system to the grid. This involves connecting the inverter to your home's electrical panel and setting up a net metering agreement with your utility company. Net metering allows you to receive credit for any excess electricity that your solar panels generate and send back to the grid.
Before you can start generating power, your solar system will need to be inspected by a qualified electrician and approved by your utility company. They will check to make sure the system is installed correctly and meets all safety requirements. Once the system is approved, you can flip the switch and start enjoying the benefits of solar energy!
Maintaining Your Solar Panel System For Optimal Performance Solar Panel Cleaning and Monitoring
Once your solar panels are up and running, it's important to maintain them properly to ensure optimal performance. This includes regularly cleaning the panels to remove dirt, dust, and debris. A simple rinse with a garden hose is often sufficient, but you may need to use a soft brush for more stubborn grime.
You should also monitor your solar system's performance to make sure it's generating the expected amount of power. Most inverters have built-in monitoring systems that allow you to track your energy production in real-time. If you notice a significant drop in performance, you may need to have your system inspected by a professional.
Cost Considerations and Financial Incentives Solar Panel Installation Costs and Rebates
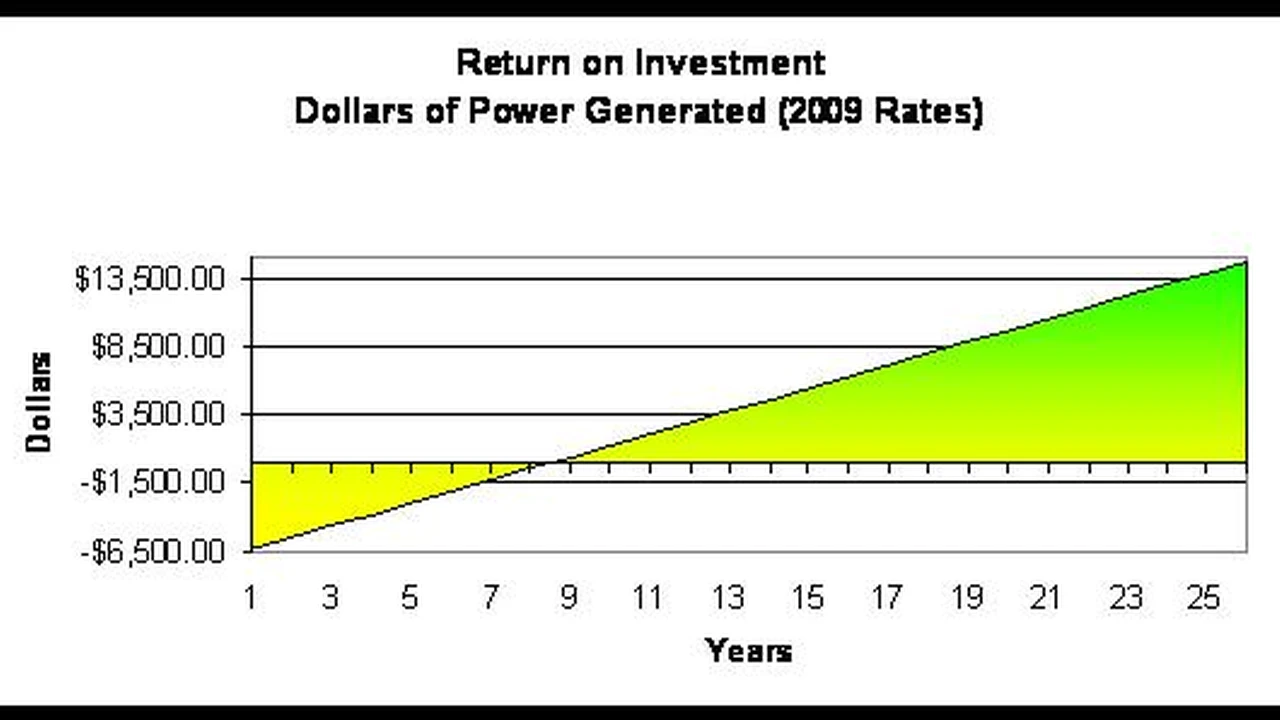
The cost of installing solar panels can vary depending on the size of your system, the type of panels you choose, and the complexity of the installation. However, there are many financial incentives available to help offset the cost, including federal tax credits, state rebates, and local incentives.
The federal solar tax credit currently allows you to deduct 26% of the cost of your solar system from your federal taxes. Many states also offer rebates or tax credits for solar installations. In addition, some utility companies offer net metering programs that allow you to receive credit for any excess electricity that your solar panels generate and send back to the grid.
By taking advantage of these financial incentives, you can significantly reduce the upfront cost of solar panel installation and start saving money on your electricity bills right away.
:max_bytes(150000):strip_icc()/277019-baked-pork-chops-with-cream-of-mushroom-soup-DDMFS-beauty-4x3-BG-7505-5762b731cf30447d9cbbbbbf387beafa.jpg)