DIY Solar Panel Installation: Is It Right for You?

Understanding Solar Panel Installation A Homeowner's Guide
So, you're thinking about installing solar panels yourself? Awesome! It's a big decision, and definitely not for everyone. But if you're handy, motivated, and up for a challenge, DIY solar panel installation could be a great way to save money and gain a ton of satisfaction. Let's dive into what it really takes, the pros and cons, and whether it's the right fit for you.
The Allure of DIY Solar Power Saving Money and Gaining Control
Let's be honest, the biggest draw for DIY solar is the cost savings. Professional installation can add a significant chunk to the overall price of a solar panel system. Doing it yourself cuts out the labor costs, potentially saving you thousands. Plus, there's the satisfaction of knowing you built something yourself, contributing to a greener future and taking control of your energy production. It's empowering!
DIY Solar Installation The Nitty Gritty Details You Need to Know
Okay, so you're intrigued. But before you start ordering panels, let's get real about what's involved. DIY solar installation is not a walk in the park. It requires a good understanding of electrical systems, roofing, and local building codes. Here's a breakdown of the key steps:
- Planning and Design: This is where you figure out your energy needs, assess your roof's suitability, and design your system. You'll need to determine the size of your system, the type of panels, and the inverter you'll need.
- Permitting: Every municipality has its own rules and regulations regarding solar panel installation. You'll need to obtain the necessary permits before you start any work. This can involve submitting detailed plans and undergoing inspections.
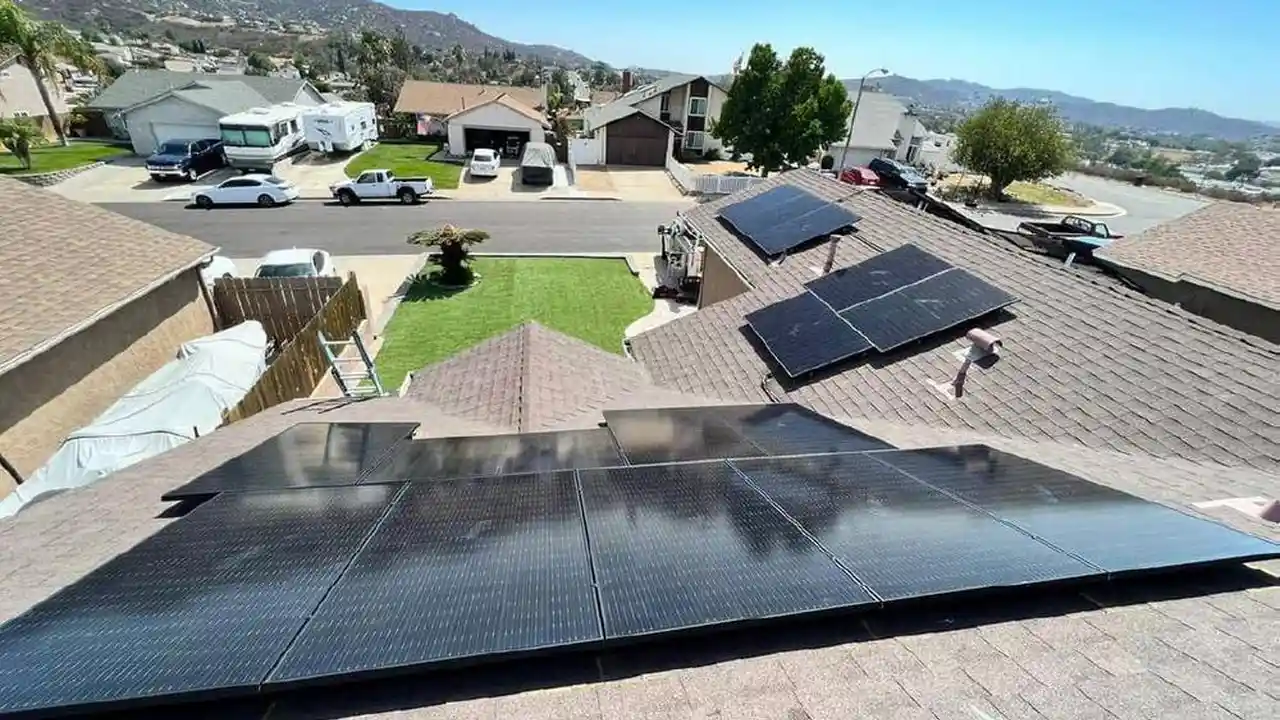
- Roof Mounting: This involves installing the mounting system that will hold your solar panels in place. This is a critical step, as it needs to be strong enough to withstand wind and weather.
- Panel Installation: Once the mounting system is in place, you can start installing the solar panels. This involves connecting the panels to each other and to the inverter.
- Electrical Wiring: This is where things get tricky. You'll need to connect the inverter to your home's electrical system. This requires a good understanding of electrical wiring and safety procedures.
- Inspection and Commissioning: Once the system is installed, you'll need to have it inspected by a qualified electrician to ensure that it meets all safety standards. After inspection, you can commission the system and start generating electricity.
DIY Solar Panel Installation Pros and Cons A Balanced Perspective
Let's weigh the advantages and disadvantages to help you decide if DIY is right for you:
Pros:
- Cost Savings: Significantly lower installation costs compared to professional installation.
- Personal Satisfaction: The rewarding feeling of building something yourself and contributing to a sustainable future.
- Increased Knowledge: You'll gain a deep understanding of how solar panel systems work.
- Control: You have complete control over the design and installation process.
Cons:
- Time Commitment: DIY solar installation can be a time-consuming project.
- Technical Expertise: Requires a good understanding of electrical systems, roofing, and building codes.
- Safety Risks: Working with electricity and heights can be dangerous.
- Permitting Challenges: Obtaining permits can be a complex and time-consuming process.
- Warranty Issues: DIY installation may void the warranty on some components.
- Potential for Errors: Mistakes can be costly and even dangerous.
Choosing the Right Solar Panels and Inverters for Your DIY Project
Selecting the right components is crucial for a successful DIY solar panel installation. Here's a look at some popular options:
Solar Panel Recommendations and Comparisons
When choosing solar panels, consider factors like efficiency, warranty, and cost. Here are a few popular choices:
REC Group Alpha Series
Description: High-efficiency panels with a long warranty. Known for their durability and performance in various weather conditions.
Usage Scenario: Ideal for homeowners looking for maximum energy production in limited roof space. Excellent for areas with high electricity costs.
Comparison: More expensive than other options, but offers superior performance and a longer lifespan. Outperforms standard panels in low-light conditions.
Price: Approximately $350-$450 per panel (370W-400W).
Panasonic EverVolt Series
Description: High-quality panels with a comprehensive warranty covering performance and labor. Known for their reliability and aesthetic appeal.
Usage Scenario: Suitable for homeowners who prioritize reliability and a sleek design. Great for homes with strict HOA requirements.
Comparison: Offers a balance of performance and cost. A strong competitor to REC Group, with a slightly lower price point.
Price: Approximately $300-$400 per panel (360W-390W).
Canadian Solar HiKu Series
Description: More affordable panels with a good balance of performance and cost. A popular choice for budget-conscious homeowners.
Usage Scenario: Perfect for larger installations where cost is a primary concern. Suitable for areas with ample sunlight.
Comparison: Offers a lower price point than REC and Panasonic, but with slightly lower efficiency and a shorter warranty.
Price: Approximately $200-$300 per panel (330W-360W).
Inverter Recommendations and Comparisons
The inverter converts the DC electricity generated by the solar panels into AC electricity that can be used by your home. Here are a few popular options:
Enphase Microinverters
Description: Microinverters are installed on each individual solar panel, maximizing energy production and allowing for individual panel monitoring.
Usage Scenario: Ideal for roofs with shading issues or complex orientations. Allows for easy expansion of the system in the future.
Comparison: More expensive than string inverters, but offers superior performance and flexibility. Provides detailed panel-level data.
Price: Approximately $200-$250 per microinverter.
SMA Sunny Boy String Inverters
Description: String inverters are a more traditional option, where multiple solar panels are connected in a "string" to a central inverter.
Usage Scenario: Suitable for roofs with consistent sunlight and simple orientations. A more cost-effective option for larger installations.
Comparison: Less expensive than microinverters, but less flexible and doesn't offer individual panel monitoring.
Price: Approximately $1,500-$2,500 per inverter (depending on size).
SolarEdge Inverters with Power Optimizers
Description: Combines the benefits of both microinverters and string inverters. Power optimizers are installed on each panel, and a central inverter converts the DC electricity to AC.
Usage Scenario: A good compromise between performance and cost. Offers some of the benefits of microinverters, such as panel-level optimization, without the higher price tag.
Comparison: More expensive than string inverters, but less expensive than microinverters. Offers better performance than string inverters in shaded conditions.
Price: Approximately $150-$200 per power optimizer, plus $1,500-$2,500 for the inverter.
Essential Tools and Equipment for DIY Solar Panel Installation
Besides the solar panels and inverter, you'll need a variety of tools and equipment to complete the installation. Here's a checklist:
- Safety Gear: Hard hat, safety glasses, gloves, and a safety harness.
- Electrical Testing Equipment: Multimeter, wire stripper, and crimper.
- Roofing Tools: Drill, impact driver, socket set, and measuring tape.
- Wiring and Conduit: Wires, connectors, conduit, and grounding materials.
- Lifting Equipment: Panel lifters or a crane (depending on the size of the panels).
Navigating Local Building Codes and Permits for Solar Projects
This is a crucial step! Contact your local building department to learn about the specific requirements in your area. Be prepared to submit detailed plans and undergo inspections. Don't skip this step – it's essential for safety and compliance.
Safety First Tips for a Successful and Secure Installation
Working with electricity and heights can be dangerous. Always prioritize safety. Here are a few tips:
- Turn off the power: Before working on any electrical wiring, always turn off the power at the main breaker.
- Use insulated tools: Use tools with insulated handles to protect yourself from electric shock.
- Wear safety gear: Always wear a hard hat, safety glasses, and gloves.
- Work with a partner: Never work alone on a DIY solar panel installation project.
- Hire a professional if needed: If you're not comfortable with any aspect of the installation, hire a qualified electrician or solar installer.
Troubleshooting Common DIY Solar Installation Issues and Their Solutions
Even with careful planning, you might encounter some challenges. Here are a few common issues and how to address them:
- Roof Leaks: Properly seal all roof penetrations to prevent leaks.
- Wiring Problems: Double-check all wiring connections to ensure they are secure and properly grounded.
- System Performance Issues: Monitor your system's performance to identify any problems. Use a multimeter to check the voltage and current of each panel.
Maximizing Your Solar Investment Tips for Efficiency and Longevity
Once your system is up and running, here are a few tips to maximize your investment:
- Regular Maintenance: Clean your solar panels regularly to remove dirt and debris.
- Monitor Performance: Track your system's performance to identify any potential problems.
- Optimize Energy Usage: Reduce your energy consumption to maximize the benefits of your solar panel system.
Is DIY Solar Right for You A Final Assessment
So, is DIY solar panel installation right for you? If you're handy, motivated, and willing to put in the time and effort, it can be a rewarding and cost-effective way to generate your own electricity. But if you're not comfortable with electrical work or roofing, it's best to leave it to the professionals.
Remember to thoroughly research your local regulations, invest in quality components, and prioritize safety. Good luck!
:max_bytes(150000):strip_icc()/277019-baked-pork-chops-with-cream-of-mushroom-soup-DDMFS-beauty-4x3-BG-7505-5762b731cf30447d9cbbbbbf387beafa.jpg)